 21.05.2024, 12:41
 Sprache ändern
 Registrieren
 Anmelden
Sie sind nicht angemeldet.
Lieber Besucher, herzlich willkommen bei: Aqua Computer Forum. Falls dies Ihr erster Besuch auf dieser Seite ist, lesen Sie sich bitte die Hilfe durch. Dort wird Ihnen die Bedienung dieser Seite näher erläutert. Darüber hinaus sollten Sie sich registrieren, um alle Funktionen dieser Seite nutzen zu können. Benutzen Sie das Registrierungsformular, um sich zu registrieren oder informieren Sie sich ausführlich über den Registrierungsvorgang. Falls Sie sich bereits zu einem früheren Zeitpunkt registriert haben, können Sie sich hier anmelden.

Like my dashboard , minimally on the LH secondary monitor lol

I hate that imgur does not allow access while using a VPN (403.jpg)
Zitat
What does an error code 403 mean?
The 403 error, also called 403 forbidden error, or HTTP 403 error code, is issued by a server if a client (browser) lacks the required access rights. Access is “forbidden” and the message “Error 403 – Forbidden” appears in the browser window.
Dieser Beitrag wurde bereits 1 mal editiert, zuletzt von »InfoSeeker« (30. Juli 2022, 13:23)
I have some questions spring to mind reading this very interesting thread.
1. How do people display thier dashboards? In a window? Desktop mode? How big?
2. Do people use any other dashboard type apps - AIDA64 Extreme sensor panel etc? (I used AIDA on my outgoing system, I didn't even run the aquaero app, just had it running off it's firmware with my settings uploaded to it, but had the aquero data fed through to the AIDA super minimal sensor panel app)
3. Does anyone use a dedicated physical display screen to display the dashboard? If so, what kit / equipment do you use? Ideally I'd love a 7- 9 inch screen sitting on my desk disaplying the Aquausuite dashboard.
Thanks guys
1. I have 2 internal displays which I described in my post above HERE. They both work well but require different overview page layouts because of their different aspect ratios, sizes, and orientations. On my desktop, I have 2 displays set up side by side. In the Windows raster, my internal stat displays are way over on the right side, starting X-coordinate is 2049. If I send this overview page to the desktop, I have to scroll way over to see it. So I copied the page and changed all of the left side X coordinates to 0. This way when I send it to the desktop, I select the version with the X coordinates changed to 0. This version of the page appears on my left display so I don't have to scroll right to see them.
2. I have played around with the Sensor Panel feature in AIDA64. You can customize things way more than in Aquasuite but the editing process can get quite tedious. They have a forum for sensor panel files that many people are willing to share. Some of the sensor panel layouts on their forum are works of art. I found that Aquasuite's Overview Page feature does everything I need but comparing it to AIDA, it is definitely more limited. I don't run AIDA with Aquasuite running because I already have HWINFO running. If your Aquaero is running without any need of Aquasuite, then doing that and using the AIDA sensor panel feature is a viable option. To some extent, its a matter of preference.
3. You didn't mention what aspect ratio you want. My1920x480 display is 8..8" wide. It's a FormulaMod clone of a Barrow FBEHD-01. I recently bought another 1920x480 display on Amazon. It's a WaveShare. I liked this one because it has a fully finished chassis and a nice little adjustable folding stand thing built into the back, so it would be good on a desktop. There are cheaper versions that have exposed circuit boards on the back. WaveShare makes a lot of different sizes and shapes.
1. I have 2 internal displays which I described in my post above HERE. They both work well but require different overview page layouts because of their different aspect ratios, sizes, and orientations. On my desktop, I have 2 displays set up side by side. In the Windows raster, my internal stat displays are way over on the right side, starting X-coordinate is 2049. If I send this overview page to the desktop, I have to scroll way over to see it. So I copied the page and changed all of the left side X coordinates to 0. This way when I send it to the desktop, I select the version with the X coordinates changed to 0. This version of the page appears on my left display so I don't have to scroll right to see them.
.
This reminds me.
If(as I do) you have an old iPad Air lying around you can turn it into a supplementary monitor
https://www.splashtop.com/en-gb/wiredxdisplay
(NB also works with other IPads & Tablets)

@Speedy-VI and WinstonWoof - great guys, thanks. Both of those routes look very good. Speedy-VI I hadn't properly understood your first post, very interesting. Am looking at 7inch to 10 inch rasperry pi screens or cctv screen on the internet. Looks to be lots of options out there for a little screen for desktop mounting. The spare Ipad route looks good too - but am reading mixed messages online about the connectivity of the software? How relaible is it?
Dieser Beitrag wurde bereits 1 mal editiert, zuletzt von »alexkyriak« (16. September 2022, 23:36)
@Speedy-VI and WonstonWoof - great guys, thanks. Both of those routes look very good. Speedy-VI I hadn't properly understood your first post, very interesting. Am looking at 7inch to 10 inch rasperry pi screens or cctv screen on the internet. Looks to be lots of options out there for a little screen for desktop mounting. The spare Ipad route looks good too - but am reading mixed messages online about the connectivity of the software? How relaible is it?
If I'm being honest I only use it occasionally but the times I have used it I havent noticed any issues,.
Then again if you have a spare iPad (or other tablet ) lying around is a free option to try
Yeah what I am doing with 2 physical status displays driven by one Overview page is kind of weird but it works. An Overview page item can have any starting coordinates so if you have multiple displays, you can put items on any and all of them if you want. I probably didn't explain it clearly.@Speedy-VI and WonstonWoof - great guys, thanks. Both of those routes look very good. Speedy-VI I hadn't properly understood your first post, very interesting. Am looking at 7inch to 10 inch rasperry pi screens or cctv screen on the internet. Looks to be lots of options out there for a little screen for desktop mounting. The spare Ipad route looks good too - but am reading mixed messages online about the connectivity of the software? How relaible is it?
Using an iPad as a display is an interesting idea. I did a quick Google search on how to use an iPad as a Windows display. One site said it's done through iTunes. Another referred to Splash Top which I think costs money. What software did you read mixed reviews of?
Also, there are some small displays (ex - Beada Panel) that connect via USB instead of sending them video over HDMI. They are not high resolution but good enough for their size. I think you have to install specific apps to use them. They are an option and AIDA supports some of them, I think including the Beada panels.
Yeah what I am doing with 2 physical status displays driven by one Overview page is kind of weird but it works. An Overview page item can have any starting coordinates so if you have multiple displays, you can put items on any and all of them if you want. I probably didn't explain it clearly.@Speedy-VI and WonstonWoof - great guys, thanks. Both of those routes look very good. Speedy-VI I hadn't properly understood your first post, very interesting. Am looking at 7inch to 10 inch rasperry pi screens or cctv screen on the internet. Looks to be lots of options out there for a little screen for desktop mounting. The spare Ipad route looks good too - but am reading mixed messages online about the connectivity of the software? How relaible is it?
One site said it's done through iTunes. Another referred to Splash Top which I think costs money.
Splashtop Wired X DIsplay is Free
https://apps.apple.com/us/app/splashtop-…or/id1029826353
https://www.splashtop.com/en-gb/wiredxdisplay
Splashtop do have a paid for app for remote access
Thank you for clarifying that. I think the remote access paid version is what I was recalling. I think I have an old iPad somewhere. I'm going to dig it up and try connecting it.Yeah what I am doing with 2 physical status displays driven by one Overview page is kind of weird but it works. An Overview page item can have any starting coordinates so if you have multiple displays, you can put items on any and all of them if you want. I probably didn't explain it clearly.@Speedy-VI and WonstonWoof - great guys, thanks. Both of those routes look very good. Speedy-VI I hadn't properly understood your first post, very interesting. Am looking at 7inch to 10 inch rasperry pi screens or cctv screen on the internet. Looks to be lots of options out there for a little screen for desktop mounting. The spare Ipad route looks good too - but am reading mixed messages online about the connectivity of the software? How relaible is it?
One site said it's done through iTunes. Another referred to Splash Top which I think costs money.
Splashtop Wired X DIsplay is Free
https://apps.apple.com/us/app/splashtop-…or/id1029826353
https://www.splashtop.com/en-gb/wiredxdisplay
Splashtop do have a paid for app for remote access
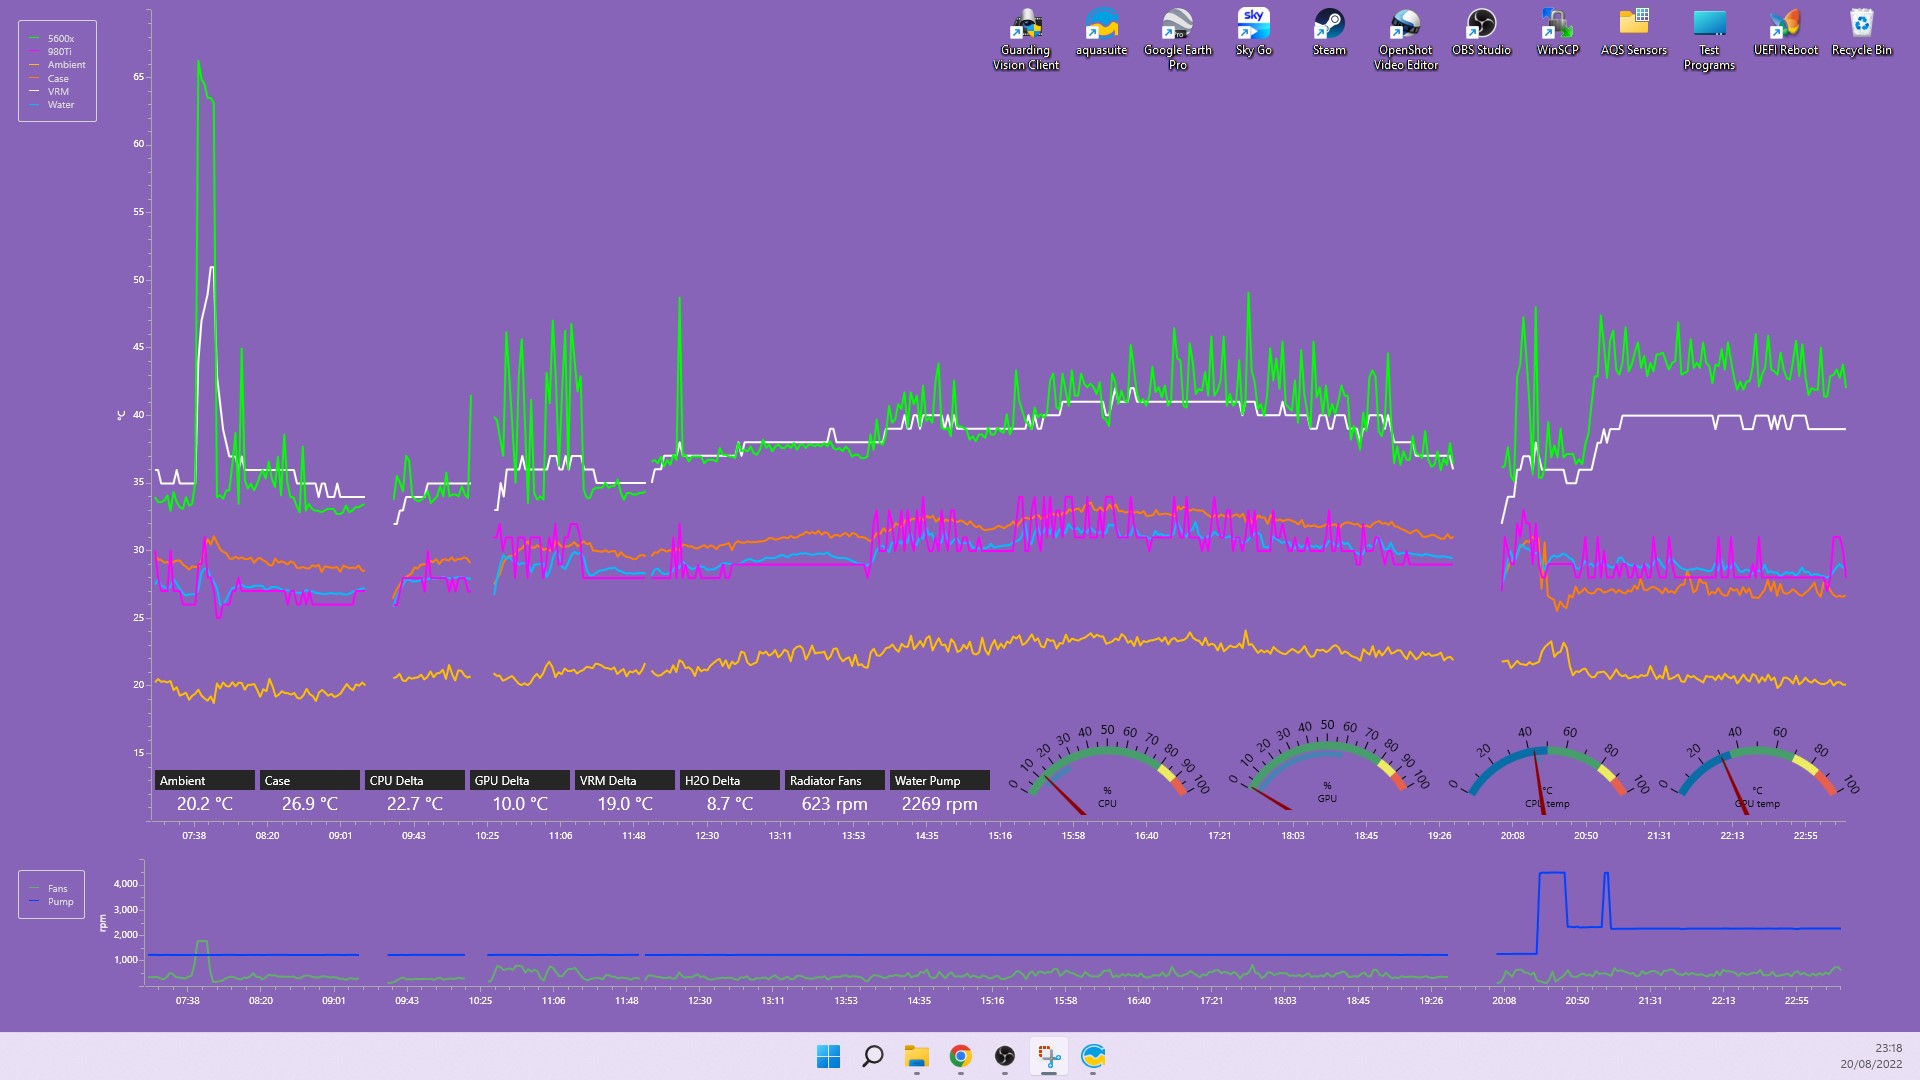
I have made some changes to my dashboard/desktop. The clock is now centered on my desktop background over the Liquid Devil logo. The outer ring is a 24 hr clock and the inner ring is 60 minute "hand". The pump and fan icon "animate" but I don't want to install Radeon Relive only to capture desktop video. The distroplate is the Phanteks 120 one which is the actual one I have in the rear of the P600s. Hopefully I can get the reservoir icon to animate about the y-axis so that we can see water movement.
Impressive. This looks like something that can be done in an AIDA sensor panel but I don't know how you are doing some of these things in Aquasuite.I have made some changes to my dashboard/desktop. The clock is now centered on my desktop background over the Liquid Devil logo. The outer ring is a 24 hr clock and the inner ring is 60 minute "hand". The pump and fan icon "animate" but I don't want to install Radeon Relive only to capture desktop video. The distroplate is the Phanteks 120 one which is the actual one I have in the rear of the P600s. Hopefully I can get the reservoir icon to animate about the y-axis so that we can see water movement.
May I ask how you got the time of day into the Overview page? Also, how did you get the day of the week to say "Thursday"? When I select data source Time - Day of Week, I just get a number. I suspect this can be changed by editing the XAML code, depending on how the data binding is done.
I started a thread about adding time of day HERE. Turns out it requires writing custom XAML code which some of the more experienced forum members kindly submitted several attempts. Sebastian (Aquacomputer Rep) posted that date and time will be added in the XAML presets in the next release of Aquasuite for those of us who don't know how to write the code.
I am also wondering how you got those different icons in there, let alone animating them. I tried adding an XAML block and loading the Animation with Data Binding XAML preset. I set the date source to a fan RPM. I get an animated fan that spins but its quite "jerky" in its rotation. The animation does not speed up and slow down with fan speed but it will stop spinning if the fan stops spinning, so it does at least indicate that the fan RPM is greater than zero. It's also a dull gray color, not nice and white like your fan. I don't know how to bring in an icon or an image file. Are you doing all of this with custom XAML code?
For capturing a quick video of a window, I used OBS Studio which was pretty easy to figure out.
I shall try to be as concise and answer as much as I can. This is the code block that I use for mapping the integer values to day name:Impressive. This looks like something that can be done in an AIDA sensor panel but I don't know how you are doing some of these things in Aquasuite.I have made some changes to my dashboard/desktop. The clock is now centered on my desktop background over the Liquid Devil logo. The outer ring is a 24 hr clock and the inner ring is 60 minute "hand". The pump and fan icon "animate" but I don't want to install Radeon Relive only to capture desktop video. The distroplate is the Phanteks 120 one which is the actual one I have in the rear of the P600s. Hopefully I can get the reservoir icon to animate about the y-axis so that we can see water movement.
May I ask how you got the time of day into the Overview page? Also, how did you get the day of the week to say "Thursday"? When I select data source Time - Day of Week, I just get a number. I suspect this can be changed by editing the XAML code, depending on how the data binding is done.
I started a thread about adding time of day HERE. Turns out it requires writing custom XAML code which some of the more experienced forum members kindly submitted several attempts. Sebastian (Aquacomputer Rep) posted that date and time will be added in the XAML presets in the next release of Aquasuite for those of us who don't know how to write the code.
I am also wondering how you got those different icons in there, let alone animating them. I tried adding an XAML block and loading the Animation with Data Binding XAML preset. I set the date source to a fan RPM. I get an animated fan that spins but its quite "jerky" in its rotation. The animation does not speed up and slow down with fan speed but it will stop spinning if the fan stops spinning, so it does at least indicate that the fan RPM is greater than zero. It's also a dull gray color, not nice and white like your fan. I don't know how to bring in an icon or an image file. Are you doing all of this with custom XAML code?
For capturing a quick video of a window, I used OBS Studio which was pretty easy to figure out.
|
|
Quellcode |
1 2 3 4 5 6 7 8 9 10 11 12 13 14 15 16 17 18 19 20 21 22 23 24 25 26 27 28 29 30 31 32 33 34 35 36 37 38 39 40 41 42 43 44 45 46 47 48 49 50 51 52 53 54 55 56 57 58 59 60 61 62 63 64 65 66 67 68 69 70 71 72 73 74 75 76 77 78 79 80 81 82 83 84 85 86 |
<UserControl	x:Name="this"
	xmlns="http://schemas.microsoft.com/winfx/2006/xaml/presentation"
	xmlns:x="http://schemas.microsoft.com/winfx/2006/xaml"
	xmlns:mc="http://schemas.openxmlformats.org/markup-compatibility/2006"
	xmlns:d="http://schemas.microsoft.com/expression/blend/2008"
	xmlns:sys="clr-namespace:System;assembly=mscorlib"
	mc:Ignorable="d" d:DesignHeight="300" d:DesignWidth="300">
	<Grid>
    	<!--Simple databinding example-->
    	<!--1. set up connection for this item (ie. temperature sensor) -->
    	<!--2. bind values to your own user control-->
    	<!--3. use data trigger and converter to switch properties-->

    	<!--Usage of Converter:-->
    	<!--The Converter returns True or False-->
    	<!--The Converter needs a ConverterParameter to compare the value-->
    	<!--Use Binding with Converter:-->
    	<!--Binding="{Binding ElementName=this, Path=DataContext.Value, ConverterParameter=27, Converter={StaticResource CompareSmalerConverter}}"-->
    	<!--Available Converters:-->
    	<!--CompareSmallerConverter: true if bound value smaller than ConverterParameter-->
    	<!--CompareGreaterEqualConverter: true if bound value bigger or equal to ConverterParameter-->
    	<!--CompareEqualConverter: true if bound value is equal to ConverterParameter-->

    	<!--default background-->
    	<!--Rectangle Style="{StaticResource GadgetBackgroundStyle}"/-->
    	<!--Rectangle Style="{StaticResource Color42Brush}"/-->
    	<!--text-->
    	<!--Content: do not define this property-->
    	<!--this is defined when you define the style trigger-->
    	<TextBlock
        	Opacity="1.0"
        	Height="Auto"
        	Width="Auto"
        	Foreground="#FFFF00FF"
        	Background="#00000000"
        	FontSize="54"
        	FontFamily="Gabriola"
        	FontWeight="Normal"
        	Margin="0,0,0,0"
        	Padding="0,0,0,0"
        	HorizontalAlignment="Center"
        	VerticalAlignment="Center">
        	<TextBlock.Style>
            	<Style TargetType="{x:Type TextBlock}">
                	<Style.Triggers>
                    	<DataTrigger
                        	Value="0"
                        	Binding="{Binding ElementName=this, Path=DataContext.Value}">
                        	<Setter Property="Text" Value="Sunday"/>
                    	</DataTrigger>
                    	<DataTrigger
                        	Value="1"
                        	Binding="{Binding ElementName=this, Path=DataContext.Value}">
                        	<Setter Property="Text" Value="Monday"/>
                    	</DataTrigger>
                    	<DataTrigger
                        	Value="2"
                        	Binding="{Binding ElementName=this, Path=DataContext.Value}">
                        	<Setter Property="Text" Value="Tuesday"/>
                    	</DataTrigger>
                    	<DataTrigger
                        	Value="3"
                        	Binding="{Binding ElementName=this, Path=DataContext.Value}">
                        	<Setter Property="Text" Value="Wednesday"/>
                    	</DataTrigger>
                    	<DataTrigger
                        	Value="4"
                        	Binding="{Binding ElementName=this, Path=DataContext.Value}">
                        	<Setter Property="Text" Value="Thursday"/>
                    	</DataTrigger>
                    	<DataTrigger
                        	Value="5"
                        	Binding="{Binding ElementName=this, Path=DataContext.Value}">
                        	<Setter Property="Text" Value="Friday"/>
                    	</DataTrigger>
                    	<DataTrigger
                        	Value="6"
                        	Binding="{Binding ElementName=this, Path=DataContext.Value}">
                        	<Setter Property="Text" Value="Saturday"/>
                    	</DataTrigger>
                	</Style.Triggers>
            	</Style>
        	</TextBlock.Style>
    	</TextBlock>
	</Grid>
</UserControl>
|
Those icons are simply png files. Some came with aquasuite under ..aquasuite\Content\images, depending on where you installed yours. Others I grabbed from the world wide web. I also noticed that the fan icon was spinning funny initially. Then it dawned on me that it's simply a square image so I looked into the XAML code and adjust the x-y axis so that it's centered. For example, a 200x200 png, its center would be x=100 and y=100.
Here's the code for the white fan (that image came with aquasuite):
|
|
Quellcode |
1 2 3 4 5 6 7 8 9 10 11 12 13 14 15 16 17 18 19 20 21 22 23 24 25 26 27 28 29 30 31 32 33 34 35 36 37 38 39 40 41 42 43 44 45 46 47 48 49 50 51 52 53 54 55 56 57 58 59 60 |
<UserControl
	x:Name="this"
	xmlns="http://schemas.microsoft.com/winfx/2006/xaml/presentation"
	xmlns:x="http://schemas.microsoft.com/winfx/2006/xaml"
	xmlns:mc="http://schemas.openxmlformats.org/markup-compatibility/2006"
	xmlns:d="http://schemas.microsoft.com/expression/blend/2008"
	xmlns:i="http://schemas.microsoft.com/xaml/behaviors"
	xmlns:im="http://schemas.microsoft.com/xaml/behaviors"
	xmlns:sys="clr-namespace:System;assembly=mscorlib"
	mc:Ignorable="d" d:DesignHeight="300" d:DesignWidth="300">

	<UserControl.Resources>
    	<!--Below this value: trigger: StopAnimation-->
    	<sys:Double x:Key="AnimationStop">100</sys:Double>
    	<!--Above or equal this value: trigger: StartAnimation-->
    	<sys:Double x:Key="AnimationStart">150</sys:Double>
    	<!--Invert the trigger behavior-->
    	<sys:Boolean x:Key="AnimationTriggerInvert">False</sys:Boolean>

    	<Style TargetType="{x:Type Image}">
        	<Setter Property="RenderTransform">
            	<Setter.Value>
                	<RotateTransform Angle="0" CenterX="50" CenterY="46" />
            	</Setter.Value>
        	</Setter>
    	</Style>

    	<Storyboard x:Key="sb">
        	<DoubleAnimation
            	Storyboard.TargetName="myImg"
            	Storyboard.TargetProperty="RenderTransform.Angle"
            	From="360"
            	To="0"
            	Duration="0:0:5"
            	RepeatBehavior="Forever">
        	</DoubleAnimation>
    	</Storyboard>
	</UserControl.Resources>

	<Grid>
    	<Image
        	x:Name="myImg"
        	Source="Content/images/fans.png"
        	Opacity="1.0"
        	Height="100"
        	Width="100"
        	Margin="0,0,0,0"
        	Stretch="Uniform"
        	StretchDirection="Both">
        	<i:Interaction.Triggers>
            	<i:EventTrigger SourceObject="{Binding ElementName=this, Path=DataContext}" EventName="StartAnimation">
                	<im:ControlStoryboardAction Storyboard="{StaticResource sb}" ControlStoryboardOption="Play"/>
            	</i:EventTrigger>
            	<i:EventTrigger SourceObject="{Binding ElementName=this, Path=DataContext}" EventName="StopAnimation">
                	<im:ControlStoryboardAction Storyboard="{StaticResource sb}" ControlStoryboardOption="Stop"/>
            	</i:EventTrigger>
        	</i:Interaction.Triggers>
    	</Image>
	</Grid>
</UserControl>
|
Good luck and have fun!
Thank you for this. I will try it out and will also try to figure out how it works. I was frustrated that the XAML presets built into AQS are quite limited so decided to start learning how to do it. My desire to have the time of day in an Overview Page presented a good starting opportunity. This code will definitely help me.I shall try to be as concise and answer as much as I can.
Good luck and have fun!
Edit to add - I found the .png files that Aquacomputer provides and was able to load different images. I changed the image file from their default "running_fan_black.png" to "fans.png" and now my rotating fan is nice and white. As for centering the image, I see that their fans.png file is 100x92 so I understand why you changed the center to 50,46. That does look better but the rotation is still jerky, not meaning it wanders around the box a little. The blade rotation is not smooth. I think this may be because AQS does not do a great job with animations (could be wrong). If you read my other post about making the time of day, I made a gauge that goes from 0 to 59 and used seconds as the data source. The gauge needle moves up as seconds climb up, but its also jerky. When the needle hits 59, it starts dropping to 0, but it drops so slowly that it never gets to 0 because seconds are counting up again. It intersects the seconds counter at about 18 seconds, then starts moving up again. I posted a video in that thread that shows this since its kind of hard to explain.
I just noticed that your rotation in inverted. I figured out how to do that, how to limit the rotation range, and how to speed it up. Changing the duration from 5-seconds to 0.5 seconds makes the blades whip around quickly but it's still quite jerky. I will keep experimenting!
Dieser Beitrag wurde bereits 2 mal editiert, zuletzt von »Speedy-VI« (13. August 2022, 01:44)
The High Flow Next flow sensor has a conductivity sensor built into it that can measure from 2 to 200uS/cm of conductivity. It is calibrated to work with Aquacomputer DP Ultra coolant. This coolant starts out with a very low conductivity. As the corrosion inhibitors in the coolant are used up, the conductivity increases. When it gets to a certain value (I think 100 uS/cm) they recommend changing the coolant.how is "water quality' is measured?
intersting
Note that this will NOT WORK with EK Cryofuel, and possibly other brands of coolant. EK Cryofuel, while claiming "low conductivity" actually starts out with very high conductivity (~2330 uS/cm). This is over 10X the maximum conductivity that the sensor in the High Flow Next can even measure!! As the corrosion inhibitors are used up, the conductivity of EK Cryofuel goes down. It behaves the exact opposite of DP Ultra. There is a thread about this on this forum wherein Aquacomputer stated that they think it's crazy to put highly conductive coolant in your loop. The high conductivity can cause inductive coupling to occur between metals, accelerating corrosion. It is also more likely to cause damage if there is a leak and the coolant gets where it should not be. I personally would not put EK Cryofuel in my loop although it is a popular choice. If you want to use the conductivity sensor to measure coolant quality, use DP Ultra coolant.
From the High Flow Next Owner's Manual -
8.1. Coolant quality
The first sensor in the list shows the current quality of the coolant. The high flow NEXT is equipped with a coolant conductivity sensor, the coolant quality is determined by comparing conductivity with the configured limits. Limits are pre-configured for DP Ultra in default configuration.
Dieser Beitrag wurde bereits 1 mal editiert, zuletzt von »Speedy-VI« (14. August 2022, 05:21)
The High Flow Next flow sensor has a conductivity sensor that will NOT WORK with EK Cryofuel,
Glad I saw this. I have EK Cryofuel in my loop, and I plan to get the High Flow Next when it is back in stock. I plan on making a few changes in the near future to my system, so I will switch to DP Ultra coolant.
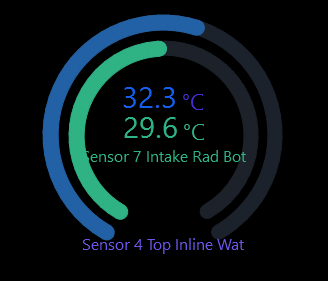
Hi guys, could someone take me through the steps of how to create a Delta T readout? Am not sure how to make this. I'd like to show the differential between intake temps, and the water temps. Would be much appreciated! Thanks 
Dieser Beitrag wurde bereits 2 mal editiert, zuletzt von »alexkyriak« (15. August 2022, 23:08)
Hey Remayz, been playing with that some more. Have now got a virtual sensor for the average water temp (combining various temperature sensors from inline sensors and pumps), and also the average of the fan channels power/speed (where some fans are combined to push/pull on a single rad). Very awesome feature, thanks for explaining it.
Ähnliche Themen
-
 English forum »
-
 Aquaero 6XT and Poweradjust 3 help Please
(23. Februar 2016, 23:18)
Aquaero 6XT and Poweradjust 3 help Please
(23. Februar 2016, 23:18)
-
- English forum »
-
Aquasuite 2015-5
(16. April 2015, 08:57)
-
- English forum »
-
Aquasuite not showing flow rate.
(19. November 2010, 05:36)
-
- Software, allgemein »
-
Coole Apple Softwaregimmicks
(3. April 2005, 14:24)
-
- Hardware, allgemein »
-
Auslesen der Temps von FP mit internem Sensor
(4. September 2002, 04:25)
-