 28.04.2024, 11:01
 Sprache ändern
 Registrieren
 Anmelden
Sie sind nicht angemeldet.
Lieber Besucher, herzlich willkommen bei: Aqua Computer Forum. Falls dies Ihr erster Besuch auf dieser Seite ist, lesen Sie sich bitte die Hilfe durch. Dort wird Ihnen die Bedienung dieser Seite näher erläutert. Darüber hinaus sollten Sie sich registrieren, um alle Funktionen dieser Seite nutzen zu können. Benutzen Sie das Registrierungsformular, um sich zu registrieren oder informieren Sie sich ausführlich über den Registrierungsvorgang. Falls Sie sich bereits zu einem früheren Zeitpunkt registriert haben, können Sie sich hier anmelden.

- 1
- 2


double sided tape yes, with a twist :
https://www.google.com/search?safe=off&s…&bih=1150&dpr=1
You can get those adhesive standoffs everywhere. The PCB is easy to take out of them too if needed.
Now that you raised the question, i may get me a few too.
https://www.google.com/search?safe=off&s…&bih=1150&dpr=1
You can get those adhesive standoffs everywhere. The PCB is easy to take out of them too if needed.
Now that you raised the question, i may get me a few too.
OOh. I might have to get me some of those!!
I used double-sided adhesive pads, but they didn't last very long. Another option for the Farbwerk is the #53087Mounting panel for poweradjust 2/3 and farbwerk, aluminum black anodized. It's made to fit 3 Farbwerks or Power Adjusts in a 5.25" drive bay but I think you could leave the sides off, mount the Farbwerk(s) to it, then mount it in your case. You could get longer screws for the 4 outside holes so they pass through the plate, the stand off, the Farbwerk, then another standoff, then through the case hole. I just bought one of these to mount a few Power Adjust 3's and that was my tentative plan. These adhesive based standoffs look a lot simpler (and cheaper) but I wonder if the adhesive will weaken after a while. I have never had good luck with adhesive tapes and pads. I don't know if its thermal cycles or if the adhesive or the pad dries out but they always seem to stop sticking. I just looked up Adhesive Standoffs on AMAZON. They have them but most of the complaints in the reviews were about them stopping sticking.
I used double-sided adhesive pads, but they didn't last very long. Another option for the Farbwerk is the #53087Mounting panel for poweradjust 2/3 and farbwerk, aluminum black anodized. It's made to fit 3 Farbwerks or Power Adjusts in a 5.25" drive bay but I think you could leave the sides off, mount the Farbwerk(s) to it, then mount it in your case. You could get longer screws for the 4 outside holes so they pass through the plate, the stand off, the Farbwerk, then another standoff, then through the case hole. I just bought one of these to mount a few Power Adjust 3's and that was my tentative plan. These adhesive based standoffs look a lot simpler (and cheaper) but I wonder if the adhesive will weaken after a while. I have never had good luck with adhesive tapes and pads. I don't know if its thermal cycles or if the adhesive or the pad dries out but they always seem to stop sticking. I just looked up Adhesive Standoffs on AMAZON. They have them but most of the complaints in the reviews were about them stopping sticking.
well, one has to cable manage a bit so the cables don't pull on the PCB too much.
the adhesive is always the weak part when you buy no-name pads. They are made to be used like in projects enclosures just to support a PCB in a box, not to hold it with cable tension.
I think when i'll get them i'll just remove the adhesive and stick some thick 3M double sided rubber. there's hundreds of references but the one i get at my supermarket is like 1mm thick transparent silicon that's super tacky. And obviously, it doesn't leave residue when taking it off.
OOh. I might have to get me some of those!!
I used double-sided adhesive pads, but they didn't last very long. Another option for the Farbwerk is the #53087Mounting panel for poweradjust 2/3 and farbwerk, aluminum black anodized. It's made to fit 3 Farbwerks or Power Adjusts in a 5.25" drive bay but I think you could leave the sides off, mount the Farbwerk(s) to it, then mount it in your case. You could get longer screws for the 4 outside holes so they pass through the plate, the stand off, the Farbwerk, then another standoff, then through the case hole. I just bought one of these to mount a few Power Adjust 3's and that was my tentative plan. These adhesive based standoffs look a lot simpler (and cheaper) but I wonder if the adhesive will weaken after a while. I have never had good luck with adhesive tapes and pads. I don't know if its thermal cycles or if the adhesive or the pad dries out but they always seem to stop sticking. I just looked up Adhesive Standoffs on AMAZON. They have them but most of the complaints in the reviews were about them stopping sticking.
Unfortunately most newer PC cases no longer have 5.25" drive bays anymore. A 2.5" SSD mounting plate like that would be way more applicable nowadays.
I've always had bad luck with the adhesive tapes eventually no longer sticking, so I'm wondering if magnets would be a better option.

Hopefully someone can measure for you. i won't have access to my PC before tonight to take dimensions.
but tbh, 3D printing a flat piece of plastic.. if you have a flat piece of plastic laying around, it's just a matter of marking holes in situ, drilling, mounting standoffs with countersunk screws for the FW360 and done. you could make 10 of those brackets in the time it takes to 3D print a monolithic one :p
but tbh, 3D printing a flat piece of plastic.. if you have a flat piece of plastic laying around, it's just a matter of marking holes in situ, drilling, mounting standoffs with countersunk screws for the FW360 and done. you could make 10 of those brackets in the time it takes to 3D print a monolithic one :p
Chaos...
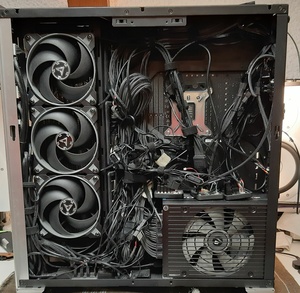
Controlled chaos
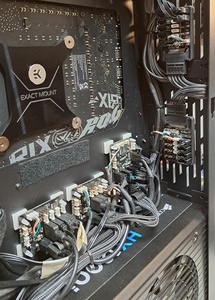
The adhesive standoffs are pretty solid, and having done my best not to get too much tug from the cables, it should be fine. Well it can't be worse than it was '
'
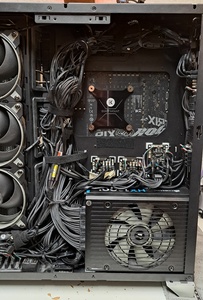
Another example with ye olde rig being converted into a 2U NAS, no space inside, so the Quadro gets the sticky standoffs treatment too (yes, a watercooled NAS is stupid, but the thing will not be used much and will mostly spend its time doing some folding@home 24/7) :
Controlled chaos
The adhesive standoffs are pretty solid, and having done my best not to get too much tug from the cables, it should be fine. Well it can't be worse than it was
'Another example with ye olde rig being converted into a 2U NAS, no space inside, so the Quadro gets the sticky standoffs treatment too (yes, a watercooled NAS is stupid, but the thing will not be used much and will mostly spend its time doing some folding@home 24/7) :

just too many channels to control. I could daisy chain some but prefered to have one channel per device. so there's one channel per set of radiator fans (3) one for the back fan, one for the O11 front leds plus the reservoir together, one for the GPU block, one for the active backplate, one for the CPU and one for the long strip that does all the interior lighting. One radiator and the interior strips (84 leds for that one) are on splitty 12s just to offload the 5V power to the PSU as these caused the FW360 channel to shut down on white lighting (that i only use to see where to brush the dust off).
But the Octo is really all i need. These days I have the RGB turned off anyway.
It's also pretty busy with one PWM channel per rad, on of them having a push pull (2 channels), one on the back 120mm intake and another 92mm intake on the PCIE bracket opening, plus the pump. that only leaves me one free PWM channel. Tinkered for a long while to get the most cooling off the O11xl until i settled on that weird but good layout :p that's why the cable malagement was so.. organic lol ! It changed a lot and i never cleaned it up.
Very nice.
Those PCB adhesive standoffs look decent. I also found there is a sort of same version but with magnets:

I wonder if this would also be a good solution for mounting these controllers? I'm just concerned with magnets and electronics, but I'm sure small magnets like that wouldn't do any harm.
You wouldn't happen to also know the size of the screw holes on the Farbwerk, would you?
Those PCB adhesive standoffs look decent. I also found there is a sort of same version but with magnets:
I wonder if this would also be a good solution for mounting these controllers? I'm just concerned with magnets and electronics, but I'm sure small magnets like that wouldn't do any harm.
You wouldn't happen to also know the size of the screw holes on the Farbwerk, would you?
Dieser Beitrag wurde bereits 1 mal editiert, zuletzt von »Wallboy« (16. Juli 2023, 04:45)
Oh those stand-offs with magnetic bases are interesting. Are they Neodymium magnets? Can you post a link for where to get these? I did a quick search on Amazon and found THESE which are for a Rasberry Pi Zero but should work for an Aquacomputer controller. They might even be better than what you posted because the magnet is larger. I also found THESE which have an M6 male thread but think they may be too big.Very nice.
Those PCB adhesive standoffs look decent. I also found there is a sort of same version but with magnets:
Definitely an improvement. Cable management is the price we pay for having all these controllers. I took the back panel off my case and set a little table behind it. My controller wiring has now grown out of the case and onto the table. I decided to relocate yjr controllers and really need to just rip all the wiring out, re-install the controllers in their new locations, and rewire everything. It’s a tedious and time-consuming process for sure. Unless you are willing to custom make every cable, there is only so much you can do.Controlled chaos
The adhesive standoffs are pretty solid, and having done my best not to get too much tug from the cables, it should be fine. Well it can't be worse than it was
haha!
Zitat
My controller wiring has now grown out of the case and onto the table
it is a lot of work. Just doing that took me more time than to redo the tubing when i changed the radiators (~4 hours of work). And most of the work was seeing where to bundle all the excess cables so it doesn't look too bad.
I'm honestly tempted to finish swapping the remaining mixed brands fans with EK FPT to avoid the headache when opening that back panel stuffed with ARGB daisy chains and PWM splitters. I have two radiators with FPT fans and that accounts for a LOT of the missing mess. Now i also know where i need PWM extensions, what adapters would do a neater job here or there.. and it's stuff that will pretty much be set in stone once finished, since the fans and lighting doesn't move even during upgrades.
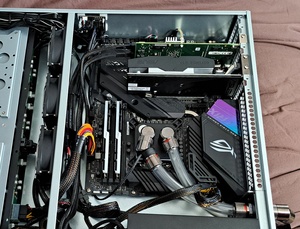
Well since you showed your backside, I will show mine.it is a lot of work.
IMG_3342C.jpg
IMG_3340C.jpg
My “test loop” is still sitting on a table with a bunch of cables running into the back of the case. My CPU is still on an AIO and my GPU still had the factory cooler on it. My real job schedule is insane these days and we are in the middle of massive house repairs so I don’t have much time to work on the loop. I built the loop on a table so I could test everything but months later it’s still sitting there. When I tear the machine apart to install all the loop hardware, I will relocate some of the controllers and redo the wiring.
My Fractal case has 2 sliding drive bays under the PSU shroud behind the PSU. I thought it would be a good idea to mount my Octo, 2 Farbwerks, Hubby7, and NZXT internal USB hubs on the slide-out drive trays. Power comes in from the back of the drive bays while all the other cables exit to the case rear. I tried to make service loops in the cable harnesses so I could slide the trays out when I need to get to those devices. It worked well but eventually, the cable harnesses got so big that it became difficult to slide a tray forward. I am rethinking this whole thing.
Some of the controllers on the "overflow table" are just connected to test them. When FrozenCPU had their going-out-of-business sale and marked their entire inventory down 90%, I bought 2 PowerAdjust 3’s for $5 each. They usually cost about $40 but Frozen’s regular price was $20 and with the discount, they were $5. I could not resist, even though I have no immediate use for them. I also have an Octo hooked up for fan testing, and a second Hubby7. The CPU block is connected for Vision testing and helping the author of SIV to add support for the Vision display (which he has now done).
How are the EK-FPT fans? I am switching to Phanteks T30’s and D30’s when I put the loop in. I checked the specs and saw that the EKs are 27mm thick, and they kept the LEDs out of the housing to not sacrifice performance. The static pressure is only 2.7mm H2O but maybe their frame seals to the rad better than some other brands? I assume you are using EK-OmniLink to daisy chain the fans. Fan tech is getting better lately and we are starting to see some actual innovation.
The D30 seems to compensate the small rotor diameter with thickness. I'd honestly expect it to work like a standard 25mm fan when used at regular speeds. I can't wait for GN to start publishing fan tests to finally know better, since few manufacturers bother to publish their P/Q curves, and they don't even tell the whole story, just like the static pressure value at max speed.
The FPT does seal well on the radiator, that's the whole goal of the fan. "Full pressure technology", fancy word to say no air leaking between fans and rad.
I personally always preffered EK fans purely for performance and wouldn't have removed the X3M i had if the bearings didn't suck *ss. The FPT is a radiator beast basically, but with fluid dynamic bearing instead of the ball bearings the X3M had.
I get proper wind coming off the radiators when i game, with the fans spinning at 1100 - 1200 RPM and they don't have that higher pitch sound signature the bequiet light wings or arctic fans have (those perform really well too).
So yea, what sold me on them was the stupid static pressure at average speeds, silence (more exactly, the lower pitch sound signature) and the omnilink system.
I can"t compare with the D30 or other fans obviously, i don't have a wind tunnel they don't cool the loop more, or less. Fans will just change the noise level for the same cooling. In my case they are quieter and spin slower than the light wings they replace, when set to roughly the same cooling.
replacing two 30mm rads with 45mm had a lot more effect than changing fans. This had a big impact on cooling and allowed to drop the fan speeds even further.
The FPT does seal well on the radiator, that's the whole goal of the fan. "Full pressure technology", fancy word to say no air leaking between fans and rad.
I personally always preffered EK fans purely for performance and wouldn't have removed the X3M i had if the bearings didn't suck *ss. The FPT is a radiator beast basically, but with fluid dynamic bearing instead of the ball bearings the X3M had.
I get proper wind coming off the radiators when i game, with the fans spinning at 1100 - 1200 RPM and they don't have that higher pitch sound signature the bequiet light wings or arctic fans have (those perform really well too).
So yea, what sold me on them was the stupid static pressure at average speeds, silence (more exactly, the lower pitch sound signature) and the omnilink system.
I can"t compare with the D30 or other fans obviously, i don't have a wind tunnel
they don't cool the loop more, or less. Fans will just change the noise level for the same cooling. In my case they are quieter and spin slower than the light wings they replace, when set to roughly the same cooling.replacing two 30mm rads with 45mm had a lot more effect than changing fans. This had a big impact on cooling and allowed to drop the fan speeds even further.
- 1
- 2
Ähnliche Themen
-
 English forum »
-
 RGBpx future
(11. April 2019, 11:41)
RGBpx future
(11. April 2019, 11:41)
-
- English forum »
-
Bezel Mounting Brackets, Poweradjust LED Indicators
(9. Januar 2015, 10:56)
-
- English forum »
-
without fitting question
(21. Juni 2006, 16:57)
-